Quantcast
Channel: Geekbuying
Viewing all 3184 articles
Browse latest View live

How to Update Aluminum Brushless Gimbal for GoPro Sport Camera DJI Inspire Aircraft


[ROM Download]R8 Rockchip RK3368 2G 8G TV BOX Firmware 190455 150921

Zenfome 2 ( ZE551 ML) Charging Analysis

$
0
0

HI Guys

Today we will do a charging analysis for Zenfone 2, Model: ZE551ML.

Zenfone 2 has a 3000 mAh Li-Polymer battery and support boostmaster technology, which is compatible with quick charge 2.0. and Qualcomm also list Zenfone 2 as supported device in their official site.

96C705DC-91DE-4563-83DE-3447F0C9321E

The model we test is ZE551ML, 4G/32G, We are surprising to see ASUS don’t include the fast charger in this model, just regular charger, here is the photo:

IMG_3120

IMG_3119

The standard charger just can offer 5.2V/ 1.35A. and ASUS includes a short usb cable ( about 0.9cm length) , see here:

IMG_3121


and we test the no-load volt for the stock charger, see here:

IMG_3123

Now we begin to test the total charging time with stock 5.2V/1.35A power adapter and usb cable. We have made our Zenfone 2 battery to 0% and here is the test result:

Time Battery level Volt Current
PM 1:34:00 0 4.9V 1.13A
PM 1:44:00 Battery is low, can’t power on to show the battery level
PM 1:54:00
PM 2:04:00
PM 2:14:00 23% 4.9V 1.13A
PM 2:24:00 29% 4.92V 1.12A
PM 2:34:00 36% 4.92V 1.12A
PM 2:44:00 43% 4.92V 1.1A
PM 2:54:00 49% 4.92V 1.1A
PM 3:04:00 55% 4.92V 1.1A
PM 3:14:00 61% 4.92V 1.1A
PM 3:24:00 68% 4.92V 1.1A
PM 3:34:00 74% 4.92V 1.1A
PM 3:44:00 80% 4.93V 1.03A
PM 3:54:00 86% 4.97V 0.8A
PM 4:04:00 90% 4.97V 0.75A-0.55A
PM 4:14:00 94% 5.02V 0.38A
PM 4:24:00 97% 5.02V 0.32A
PM 4:34:00 99% 5.04V 0.2A
PM 4:41:00 100% 5.08V 0.16A


The total charging time is 3 hours 7 mins with regular charger, and you just can get 20% battery in 30 mins (PS: we found an interested thing, the zenfone 2 can’t be powered on if the battery is lower than 20%, i am not sure if it is my phone problem or you guys also have this problem?). After charging for 1 hour, we just get 36% battery, charging 2 hours, we get 68% battery, charging 3 hours, the battery is almost full. The Charging current will become smaller as the battery growing. but max, you just get 1.13A. Here is a photo we take when we test:

IMG_3125


Frankly speaking, If we don’t test with quick charge 2.0 chargers, we might think the charging speed is OK, Most people might think they just leave the phone to charge overnight, and if it can charge full during the sleep, then it is ok. :) However, if you tried with quick charge 2.0 chargers, i thought you should change your mind.


Now we begin to test with our chargers and cable:

Test with Tronsmart WC1Q wall charger (Qualcomm Certified, support quick charge 2.0), and Tronsmart USB cable (20AWG support high current):


Time Battery level Volt Current
AM 8:45:00 0% 9.15V 1.65A-1.56A
AM 8:55:00 Battery is low, can’t power on to show the battery level
AM 9:05:00 27% 9.15V 1.5A
AM 9:15:00 43% 9.15V 1.5A
AM 9:25:00 54% 9.16V 1.32A
AM 9:35:00 68% 9.19V 1A
AM 9:45:00 77% 9.19V 0.87A
AM 9:55:00 84% 9.2V 0.62A
AM 10:05:00 88% 9.22V 0.39A
AM 10:15:00 92% 9.23V 0.28A
AM 10:25:00 95% 9.23V 0.17A
AM 10:35:00 98% 9.23V 0.16A
AM 10:45:00 100% 9.23V 0.14A


With our chargers and cable, we get zenfone 2 from 0% to 100% in 2 hours, When it detects Zenfone 2 support quick charge 2.0, our charger just give 9V volt instead of 5V. and you get 54% battery in the first 40 mins, and in 1 hour, you get 77% battery. (while with stock standard charger, in the same time, you just get half battery). Our chargers can give 15W power to zenfone 2 at first, while the regular charger just can give 5W. That’s a big difference. We also can see in the above table, while use our charger,in the whole charging progress, Zenfone 2 always get 9V high volt , but the charging current is becoming smaller as the battery growing.

We take a photo after charging a while with our charger to show the quick charge:

IMG_3127


So from the above testing, we can see, use our quick charge 2.0 charger, you can save 36% total charging time , it can offer double battery level at the first 1 hour compare with regular charger. Like Qualcomm said, Less time charging, More time doing. And not just our wall charger, our quick charge 2.0 car charger also support Zenfone 2, you can get similar charging time when you use our quick charge 2.0 chargers.

In the end, Here is our suggestion to charge your Zenfone 2 faster:

1 If your zenfone 2 don’t equipped with a fast charger, just get one asap :)

2 Pick up some high quality usb cables, it do effect the charging, i take a photo to compare our usb cable and asus one:

IMG_3122

The above one is Tronsmart, the bottom is Asus, Our cable is thicker than ASUS because we use the 20AWG cable, i guess asus just use 24awg or 28awg. It’s good for regular charger, but for quick charge 2.0, we suggest to get the 20awg cable.

That’s all. Thanks for reading our charging analysis for Zenfone 2. If you want to read more charging analysis for other popular smartphone, check here. Any questions feel free to leave comment below.

Why Choose Tronsmart chargers:

All of Tronsmart Chargers are get certified by CE, ROHS, FCC and other certifications, all of our quick charges are certified by Qualcomm(you can find our name in the Qualcomm quick charge list), and we are also proud to be the featured quick charge brand in Qualcomm Official site. So You don’t need to worry the quality of Tronsmart chargers.

More and more flagship smartphone will support quick charge 2.0 technology, Samsung, Sony ,LG, Moto, all of these brand flag ship support quick charge, Tronsmart offer the world’s most abundant quick chargers. From 1 port usb wall charger to 5 port and from 1 port usb car charger to 4 port.


Thanks for the review.

From Tronsmart : http://www.tronsmart.com/zenfone2-ze551ml-charging-analysis

Xiaomi Mi4C Unboxing Review

$
0
0
xiaomi-mi4c

The xiaomi mi4c released in Beijing, China on September 22, 2015. It comes with months’ waiting and forecast, how could it catch so much attention from home and abroad? Why it has been know as the upgradation of xiaomi mi4 and xiaomi mi4i? We will figure it out for the following unboxing review.

The Packing Box featured by orange, which shaded any other packing boxes of xiaomi stuff.

1

Uncovering the mobile film

2

Accessories:  a quick charge adapter, an USB cable, an user manual, an battery and a card pin.

3

The white and gray xiaomi mi4c will be most people’s choice.

4

The phone brightened by its touch key on the left side, it will be more convenient to control it by one-hand.

6

7

Its Back camera comes with 13.0MP Sony Lens, focused in 1 second. Front camera is 5.0MP Sony camera with automatically beautification function.

8

5.0 inch IPS touch screen, 138.1 x 69.6 x 7.8mm dimension, it is not the thinnest phone but suitable for one-hand control.

9

It covered China mobile, China Unicom, China telecom 2 g / 3 g / 4 g network system, supported double cards dual stay and LTE + CDMA1x network connections, not necessary to distinguish between the main and vice card.

10

Thanks to the high-speed mode, intelligent roaming acceleration mode and mobile signal quickly switch mode, you could enjoy your travel without too much troubles from your smart phone.

11

Xiaomi offer white, grey, pink, yellow and blue 4c for your reference. The standard version catches 2GB RAM, 16GB ROM, and 3GB RAM, 32GB ROM for prime version. You can order it from GeekBuying now.

ROM and Upgrade Guide for CX-X3 4K Android 4.4 Allwinner H3 TVBOX 190452 150919

$
0
0
20

Hi, here is the firmware and upgrade guide for X3 TVBOX.

ROM download: X3 4K Android 4.4 Allwinner H3 TVBOX Firmware 190452 150919

Tools: x3 upgrade tools

Flash guide:

1. Install updating tools
Unzip the updating tools you download, double click to install.

1

Click the the next step as the pictutres

2
3
4

After install finished, just click the close as pictures.
5

2. Run the updating tools
click icons on you home screen of pc and you can see
6
7

Click the8 to add keys files
9

Click the10to add img files
11

Click the start12and you can see
13

3. Connect X3 to PC:
Connect OTG port of X3 to PC with Male to Male USB cable, see pictures(If no
feedback on front side on your desktop pc, try the back USB port please )
14

Then hold fn button with toothstick for several seconds and then connect the power adapter at
the same
15

And you see red button for several second
16
17

Updating successful.
18

PS:
1. First time connect X3 to PC, Win7/8 can detect the USB devices and install the
drivers automatically.
2. If first time on Win XP system, you can click the next step to install USB drivers too.
19

3. If failed to update at some time, you can redo as the previews instructions step-by-step.
20

XiaoMi Mi 4c Smartphone Release, Support Qualcomn Quick Charge 2.0 And USB Type C

$
0
0

XiaoMi unveil their new flagship yesterday, which called: MI 4c. Compare with their previous model, The Mi 4C is their first device which has usb type c port and support qualcomm quick charge 2.0 technology together.

Tronsmart, as the leading quick charge brand, we are very excited to see xiaomi is putting both technology (USB TYPE C+ quick charge 2.0) in one device, Like Mr.Lei Jun said this might be the future trends. And according to our analysis, More and more flagship smartphone will have those features, We release the world first USB TYPE C Car charger in 1 month ago, and we are ready to release more and more type c charger to lead the market!

Now let’s share the basic information about Mi 4C.

Specifications of Mi 4c
– CPU: Qualcomm Snapdragon 808 1.8 GHz 6-core 64-bit- GPU: Adreno 418 graphics processor
– Display: 5-inch 1080p, ultra-thin and narrow bezel
– Camera: 13 MP rear camera, PDAF + Front 5MP wide-angle camera, Beautify
– Battery: 3080 mAh (typ), USB Type-C port, Quick Charge 2.0
– 4G Dual SIM

164406gmmylfhfmlauae0m.png.thumb.jpg


153049z0t2s0l02u4zs08o.png.thumb.jpg


150111imfny3h0p3mm3mp4.png.thumb.jpg

As far as we know, xiaomi mi 4c includes the following accessories:

1.2m usb type c to usb cable;

a qualcomm certified quick charger ( 5V/2A, 9V/1.2A, 12V/1A, total 12w)

Usb type c adapter

So you might wonder how we can get quick charge when driving? Tronsmart give you the “PLUG & CHARGE) Solution, Choose our CCFC USB TYPE C car charger

CCFC usb type c car charger is the world first usb type c car charger, and also support qualcomm quick charge 2.0.

With CCFC car charger, You can just connect with your xiaomi mi 4c , no need to find the type c adapter, no need to worry forgetting the type c cable. what you need is just plug and charge!

And what’s more. Our CCFC car charger also offer you another usb port which also support Quick charge 2.0 and VoltIQ technology, You can connect other device to get the fastest charging speed.

We will get the XiaoMi MI 4C soon, and we will make some detail charging analysis, you can keep your eye on our charging analysis channel here.

Thanks for the review!

From Tronsmart : http://www.tronsmart.com/xiaomi-mi-4c-smartphon-release-support-qualcomm-quick-charge-20-and-usb-type-c

Xiaomi Mi 4c Charging Analysis Part 1

$
0
0

We just report Xiaomi Mi 4c information today earlier. Now, Let’s check the charging performance on Xiaomi Mi 4C.

Because our test sample is still on the way, should get tomorrow, the following test result are coming from our friend @chongdiantou, All credit to him :)

Here is the usb type c port in Mi 4c, and you need to connect your charger via type c cable to charge it.

mi 4c 01

Here is the type c cable which included in the package, the length is about 1.2m.

mi 4c 02

Xiaomi also include a USB TYPE C Adapter in case you forget to take your type c cable, and you can connect this adapter with your Mi 4c, and use the regular usb cable to charge your Mi 4c. But it is really NOT convenience for people to charger via the adapter.

153046hkvwrdwiozyzhyvr.png.thumb.jpg

Here is the photo for the stock charger in xiaomi mi 4c:

IMG_3137

This stock charger model is MDY-03-EB, input is 100-240v, output support 5V/2A, 9V/1.2A and 12V/1A, total 12w. It’s follow the qualcomm quick charge 2.0 standard, however, the total watt is lower than ours’ 18W quick charger. and this is the same charger as you seen on Mi3 and Mi4 and Mi note.

The sample we test still use preload MIUI 6, and the battery level is 60% when we do the following test.

First we test with the original Mi 4c charger, with screen on, we get this;

mi 4c 03

With screen off, we get this:

mi 4c 04

With screen on,you get 9V/1.12A, and with screen off, it change to 8.98v/0.99a, it’s a little surprised, in our charging analysis for Oneplus two, we found if you turn off the screen, the charging current will get bigger, while in xiaomi mi4c, it get smaller.

Then, we use the xiaomi ZMI QC2.0 charger to test:

IMG_2984 3

mi 4c 06


The ZMI qc2.0 charger have the same output as ours, 5V/2A, 9V/2A, 12V/1.5A, total 18W. However, the mi 4c also just accept 8.96V/1.16A.

So we can confirm xiaomi mi 4c make some current limits.Now we can’t know the limits are in kernels or the hardware.

Since no matter which quick charge 2.0 chargers you are using, the output just almost 10w, how about to try the regular 5V/2A charger? Then, next, we decide to test with Oneplus two charger:

Oneplus two offer a 5V/2A regular charger, In our charging analysis, it can give 5V/1.98A to OPT. so what’s about in the xiaomi mi 4c?

mi 4c 07

Even the charger can offer 5V/2A without problem, but xiaomi 4c just accept 1amp current. So If your charger don’t support qc2.0 quick charge, it can just give 5W output to xiaomi mi 4c. :( This is really annoying. we don’t understand why xiaomi limit current in 5V/2A regular power adapter.

Here is the first part of Xiaomi MI 4c charging analysis, we will test the total charging time from 0%-100% and compare with our tronsmart qc2.0 chargers. and will try to find the reasons why xiaomi limit the current.

But now, from the analysis, If you want quick charge your Mi 4c., you have to get qc2.0 chargers.

Xiaomi have one wall charger included in the package, If you want a backup qc2.0 wall charger, you can check our WC1Q model:

http://www.tronsmart.com/products/ts-wc1q-rapid-wall-charger

We also have multi-port QC2.0 chargers, check here:

http://www.tronsmart.com/products/-ts-wc3pc-quick-charger-2.0-rapid-wall-charger

http://www.tronsmart.com/products/ts-uc5pc-quick-charge-2.0-rapid-desktop

and if you want to charge your Mi 4c in your car with quick charge, we also have qc2.0 car charger solution:

http://www.tronsmart.com/products/usb-car-chargers

Among all of our accessories, We would love to give you a BIG RECOMMEND for our CCFC car charger, which is the world’s unique Type C + Quick Charge 2.0 support car charger

IMG_3138 2

CCFC is the world first usb type c car charger, also support quick charge 2.0 technology.

We offer the most convenience charging experience for your Mi 4c, just Plug & Charge.

You don’t need to prepare another type c cable or type c adapter, just use our CCFC type c car charger, you get anything.

Beside that, We offer another usb port for your family, which also support quick charge 2.0, never need to worry lose battery in your driving!

Stay tuned for our 2nd part charging analysis for Xiaomi Mi 4c. keep watching our Charging Analysis Channel!

Any questions, feel free to leave comment below.

From Tronsmart: http://www.tronsmart.com/xiaomi-mi-4c-charging-analysis-part-1

Teclast X98 Air (C6KN) Tablet Windows8.1 Firmware_175439

$
0
0

Hey guys, glad to share the Teclast X98 Air (ID: C6KN) Windows 8.1 firmware, please click here: X98 Air (C6KN)-Windows8.1 system files part1, part2Win8.1 flash guide.

Password: geekbuying.com

Attention matters:
1, please download all packages.
2, when unzipping, please select 4 packages together, and unzip synchronously. Don’t unzip one by one, it will cause some files lost.
3, please apply it to the corresponding ID, don’t flash on other ID.
4, please read the flash guides carefully before operating.


Elephone P8000 Review

$
0
0
P8000

Hello to Geekbuying blog visitors! Recently I received an intriguing new smartphone Elephone P8000. Lets’ check it out together now:

This is how the box looks, it adopts the same pattern as the phone’s back cover. The material is hard so it still looks fresh and new even after overseas travel:

PICTURE 1

PICTURE 2

The package consists of the smartphone, wall socket original charger, USB-microUSB cable, additional protective film and a manual.

PICTURE 3

PICTURE 4

MAIN FEATURES:

ОS: Android 5.1

CPU: MediaTek MT6753 1.3GHz 64-bit Octa-Core Processor

GPU: ARM Mali-T720

RAM: 3GB

ROM: 16GB + microSD slot

Screen: 5.5″ IPS OGS FHD 1080р, capacitive, 5 points

Two microSIM slots

Networking2G: GSM 850/900/1800MHz;

                    3G: WCDMA 900/2100MHz;

                    4G: FDD LTE: 800/1800/2600MHz

WiFi: 802.11 b/g/n; Bluetooth 4.0

GPS, A-GPS with GLONASS and BDS support

Main camera: 13.0MP, LED flash and AF

Front camera: 5.0MP

TouchID Fingerprint Scanner

Real Metal frame

Battery: 4165 mAh

Dimensions: 155.2 x 76.6 x 9.2 mm

Weight: 211 g

APPEARANCE:

PICTURE 5

On the front panel we see front camera, proximity/light sensors and speaker.

PICTURE 6

At the bottom there are “Menu”, “Home”, “Back” touch buttons, which are represented in an unusual fashion manner. The outer buttons are just blue dots and the central button is circular and has the blue LED lighting. It acts as a LED notification of missed messages, calls and low battery state.

PICTURE 7

PICTURE 8

The back cover has an elegant patterned texture, which looks really amazing.

PICTURE 9

PICTURE 10

On the back we see a camera, flashlight, TouchID fingerprint scanner and a speaker at the bottom.

PICTURE 11

PICTURE 12

There are volume and power buttons are at the left side.

IF

3.5mm headphones jack is at the top and microUSB with the mic at the bottom.

IF

Under the back cover we see the high capacity 4100+ mAh battery and three separate slots for microSIMs and microSD.

PICTURE 15

PICTURE 16

The smartphone is a heavyweight due to the metal frame. It feels nice and cool in the hand.

PICTURE 16-1

DISPLAY:

Elephone P8000 features a quality 5.5″ IPS OGS FHD 1080р capacitive touch screen. Here’s some actual photos:

PICTURE 17

PICTURE 18

PICTURE 19

PICTURE 20

The colors are vivid and saturated. As for the brightness it’s adjusted in a wide range and is suitable for using the smartphone indoors as well as under the bright sunlight.

PICTURE 21

IF

Now let’s check the viewing angles of the screen. I should say the screen really surprised me, the colors are displayed almost perfectly under any angle.

PICTURE 23

PICTURE 24

PICTURE 25


PICTURE 26

PICTURE 27

PICTURE 28

PICTURE 29

FIRMWARE AND FEATURES:

Currently Elephone P8000 is running ELE UI launcher which is based on the newest Android 5.1. Fortunately I haven’t noticed any major bugs in the firmware while testing. The way the launcher is organized can seem awkward during the first days of use to those users who are accustomed to stock Android but all in all it’s easy to get used to it.

Here’s how the smartphone “looks like” inside:

IF

IF

IF

IF

As for the pleasant additional features one can point out FOTA or Wireless Update, which’ll bring you the newest updates from the manufacturers without need of connecting the device to PC and using flashing tools.

Then the MiraVision function which allows you to set the screen parameters to your liking: make the colors more vivid or plain, change brightness levels, sharpness of the image, colors contrast and some other parameters.

And of course the FingerPrint ID feature, which provides you with opportunity to lock your smartphone from other people’s eyes and bind it to you personal fingerprints.

HARDWARE:

So what’s hidden inside Elephone P8000?

It’s based on a relatively new 64-bit Octa core MT6753 CPU with Mali-T720 GPU. This bundle is a bit less productive than the previous MT6752 chip, but it provides up to 30% powersave which paired with the high capacity battery will come in handy if you seek for a “long life” smartphone solution.

As for the memory this item features 3GB RAM and 16GB ROM which is pretty good for now. Internal memory can be also extended by microSD cards.

Overall this is still a decent performance platform which allows to use the smartphone freely in different situations be it video playback, 3D games or high load applications.

Here’s the results of popular synthetic tests which you can compare to other similar devices:

IF

IF

PICTURE 36

PICTURE 37

NETWORKING, DATA TRANSFER AND MULTIMEDIA:

Elephone P8000 supports two microSIMs in dual stand-by mode with one slot providing 4G and 3G capabilities. Here are supported frequencies:

GSM BAND 850/900/1800;

3G: 900/2100;

4G: FDD LTE: 800/1800/2600MHz

Smartphone handles the network connection well and steady, it never lost the signal while testing.

It also provides WiFi: 802.11 b/g/n 2.4G with decent quality and power-saving Bluetooth 4.0 features.

As for the navigation it supports connection to GPS and BeiDou Navigation Satellite System which allows better positioning.

IF

Elephone P8000 is equipped with average front and back speaker. The volumes are decent as well as the quality of the sound and mic.

This smartphone has a decent main camera which is Samsung S5K3L2 13-megapixel sensor with f/2.0 lens. Here are some example photos in a situation with a bad lighting which this camera module handles well:

PICTURE 38-1

PICTURE 38-2

BATTERY LIFE:

Elephone P8000 is equipped with an increased capacity battery of 4100+ mAh. I’ve checked it with a special USB charging tester and the results were impressing:

PICTURE 38-3

This smartphone can be a real long lasting wheelhorse for you.

Here are results of some usage tests which fully lived up to my expectations:

- Antutu Battery 80% test lasted for 5 hours with the maximum screen brightness:

IF

I also got a very impressive result of more than 7 hours with the brightness at minimum:

IF

3D heavy gaming test was performed using Epic Citadel‘s Tour feature and the phone lasted for 5 hours which is a good result:

IF

The last test was made by playing offlinevideos from the internal memory using VLC media player at 20% of brightness and 30% of volume (which is enough for home watching). One hour of playing consumes only about 6% of the battery which is the most impressive result:

IF

All in all I can recommend purchasing Elephone P8000 as it seems to be a successful model with decent specs and long battery life.

If you are interested in the phone, to get it from GeekBuying.

Thanks for the professional review from partner.

Review: The GPD XD Portable Android Console

$
0
0

I’m back with another Android console out of China from GPD, the GPD XD. I’ve had the GPD XD for a couple of weeks now, and to be honest I’ve been unable to put it down! In short it’s a great device for portable gaming, and it also handles my media needs with ease.

This device was generously provided by Geekbuying, so I’ll provide more information about where to buy the GPD XD from the Geekbuying store at the end of this review.

(For anybody with sharp eyes, yes I’ve got a new orange/red rug too!)

At first glance the device looks like a Nintendo 3DS XL, however that’s where the similarities end. So let’s take a look at the GPD XD hardware specs.

Hardware Specification

  • CPU: Rockchip RK3288 Quad-Core (ARM Cortex A-17)
  • GPU: ARM Mali-T764 (600MHz)
  • RAM: 2GB (DDR3-SDRAM)
  • GPU memory: Shared with RAM
  • WIFI: Supports 802.11b/g/n/ac (2.4GHz)
  • Bluetooth: Not supported
  • OS: Android 4.4.4
  • Storage: Built-in 16GB/32GB. Supports microSD up to 128GB
  • Screen: H-IPS 5.0” capacitive touch screen.
  • Resolution: 1280×720
  • Controller: Two control sticks, D-pad, Buttons (volume/power/start/select/back/home/menu/controller/A/B/X/Y/L3/R3), Triggers (L1/L2/R1/R2)
  • Battery: 6000mAh (3.8V, 22.8Wh)
  • Dimensions: 155x89x24mm
  • Weight: 300g

Besides these features, the GPD XD has a mini-HDMI port, a headphone jack and microphone, but no camera or Bluetooth.

A clamshell form-factor for an Android portable is a first for me, and to be honest it makes sense. I’ve experienced cracked screens or broken controller nubs on other consoles in the past, but with the clamshell I’m hoping this won’t be an issue.

The 6000mAh battery is a very nice feature, with this I’ve seen over 8 hours of screen-on time, while playing native Android games, emulating various systems, and streaming video.

Here’s how it compares to some other devices that I’ve got at hand

Software

This is an Android device, it comes with Android 4.4.4 in a very similar setup to the other Android consoles from GPD. It features the full Google Play services, so you can legitimately purchase/install any games with your Google account, or you can use any of the alternate app stores that come bundled on the GPD XD to download and play emulated games:

  • Happy Chick
  • KO GameBox
  • BitGames Centre
  • Playable
  • Aptoide

The GPD XD uses a launcher in the “Metro” style of Windows 8, however alternate launchers can be installed if you want a bit more control over the layout and categorisation of your games and applications.

I’m using Smart Launcher on my GPD XD, it provides a lot more control and looks a lot nicer!

My GPD XD came with firmware version 2.4.0 (using GPD’s firmware numbering system), which had some issues such as not booting after a reboot. Since then, there have been a couple of newer firmwares released, bringing us to version 3.3.3 at the time of writing this review.

Unfortunately, GPD do not provide a change log with their firmware releases, so it’s hard to see what has been changed in each release. Initially the firmware updates were hosted on the (incredibly slow to the West) Baidu Pan file host, but after some feedback from the community, they’re starting to put them up on other more accessible file hosts.

You can find a list of firmware versions, and their download links over at the “GPD XD Firmware Updates” thread on Dingoonity.

And you can find my instructions for unpacking the firmware files and working out what has changed manually over at this thread on Dingoonity.

Games

I’ve spent the past week trying lots of games, both native and emulated. The GPD XD handles emulation very well, with older systems (SNES, Sega, PS1, Mame, GBA) running very smoothly.

Through Mupen64 it can handle N64 very nicely too, with Mario Kart 64 being very smooth and playable, even over HDMI to a TV.

PSP emulation using PPSSPP generally works well, but it can be a bit slow. I’ve had some success running Tekken 6 and Little Big Planet smoothly enough.

Nintendo DS emulation worked really well, with Mario Kart DS playing very smoothly.

Dreamcast emulation is a bit hit and miss, but Soul Calibur played very nicely, if just a little laggy during cutscenes.

As of writing, the Sega Saturn emulator “uoYabause” is quite unplayable, but I think/hope this will improve in time.

HDMI-out

As the GPD XD features a mini-HDMI port, I’ve played games and vidoes through my TV a lot. This combined with a wired Xbox 360 controller, and the experience is no different to a regular console.

GPD XD Gamepad

As I mentioned in the specs above, the GPD XD features a full gamepad built in the device. In the software this can be configured to be recognised as either a PS3 sixaxis controller, or an Xbox 360 controller – to maximise the compatibility across all games and emulators.

The gamepad hardware is nice, with joystick “nubs” similar to those on the 3DS and PSPgo. The joysticks have a rubber texture to them, preventing your thumbs from slipping.

The d-pad is quite spongy, which might make it hard when playing combo-heavy games such as Street Fighter or Tekken.

The shoulder buttons are very clicky, and the position of the L2/R2 buttons is quite uncomfortable as they’ve been positioned to the side of the L1/R1 buttons, rather than below them.

As the GPD XD is running Android, and features a capacitive touch screen, you can always switch to using touch-based controls where they’re supported, or you could use the built-in gamepad settings (accessible from a hardware key) to configure the control bindings.

The GPD XD comes with an instructional video for using the built-in emulators, and key binding application. I’ve uploaded this to YouTube here:

Closing thoughts

With each new Android device that comes from China, there seems to be improvements in some ways, but shortcomings in others. The GPD XD has great controls, and performs really well with the CPU set to 1.4-1.8ghz. The GPD XD hasn’t got Bluetooth, which might be a deal breaker for some people – but the built-in gamepad is good enough, and the support for gamepads via USB OTG is great.

You can find lots of video reviews of the GPD XD over in the “GPD XD Videos” thread on Dingoonity.

You can buy the GPD XD from Geekbuying’s online store here: http://www.geekbuying.com/item/GPD-XD-5-Inch-Android4-4-Gamepad-2GB-16GB-RK3288-Quad-Core-1-8GHz-Handled-Game-Console-H-IPS-1280-768-Game-Tablet-PC—Black-347650.html

And use the following codes for discounts from Geekbuying:

  • $10 off GPD XD 16GB: FYHPAGWL
  • $10 off GPD XD 32GB: YGCJEULD

Thanks for the review.

From MAX GLENISTER: https://blog.omgmog.net/post/review-the-gpd-xd-portable-android-console/

MTK driver installation guide for Vista win7 win8 win8.1 OS

$
0
0
10

MTK flash should be done with the phone powered off, but the phone won’t install the driver automatically, so you need to install it in the phone.

This tutorial is for Vista, win7, win8 and win8.1.

Please note that windows8 & windows8.1 need to “disable driver mandatory signature”, then it can go on.(pleas refer to disable driver mandatory signature guide “for win8” or “for win8.1”)

If your computer is Ghost version, it may be simplified, the driver may won’t be installed due to something loss. Please change to original windows system computer to do the flash.

Now begin:

  1.  Download the universal driver for MTK phones.

Download and decompress it. (windows8&windows8.1 use the file “win7”)

1

  1.  Then right click “My computer”(XP is “my computer”, win8.1 is “this computer”), choose “manage(G)”

2

  1.  Choose “device manager”

3

  1.  Power off your phone, remove the battery, then install the battery after five seconds. Do not to power on, connect to the computer when the phone is power off. Now the device maneger interface will show a yellow colored “MT65XX Preloader” device. Right click it, choose “Update drive software(P)”.This device only exists for a very short time, so you need to be quick. If you lost it, you need to connect the phone to pc again.

4

  1.  Choose “Review the pc to find driver software(R)”

5

6. Click “R”

6

  1.  Choose from the decompressed files according to your pc system, win7&win8&win8.1 uses the same file”win7”

7

  1.  Make sure it’s the right file, then click next.

8

  1.  The computer will start to install the driver, if there’s a pop-up window showing the safty warning, click “Always install the driver(I)”

9

10. The computer will install the driver, wait for a while.

10

Finished. If it’s the first time you trying to do a flash with your pc, it may won’t connect successfully, please try again or restart your computer.


For win8 disable driver mandatory signature guide

$
0
0
8

This method only available for the boot time after you finish the steps below, if you reboot your computer, all these are reset, you need to do again.

This guide is for win8.


  1.  Open the Charm menu, click setting. Move your mouse cursor to the right bottom of the screen, it will show the Charm menu, or press “win” & “C” together to call it out.

1

  1.  Then click “change computer setting”

2

  1.  Left side, choose “General or common”, right side “Reboot right now”

3

  1.  Choose “Problem solution”

4

  1.  Choose advanced options

5

6. Choose “Boot setting”

6

7. Click “Restart”

7

  1.  Press F7 or number keypad “7”

8

9. After you enter the system, the diver can be installed. If a safety warning pop-up, click always install it. Please refer to the file “for Vista win7 win8 win8.1”

For win8.1 disable driver mandatory signature guide

$
0
0
9

This method is only available for the boot time after you finish the steps below, if you reboot your computer, all these are reset, you need to do again.

This guide is for win8.1.

  1.  Open the Charm menu, click setting. Move your mouse cursor to the right bottom of the screen, it will show the Charm menu, or press “win” & “C” together to call it out.

1

2. Then click “change computer setting”

2

3. Choose “Update and restore”

3

  1.  Left side “Restore”, right side “Restart now”

4

5. Choose “Problem solution”

5

6. Choose advanced options

6

7. Choose “Boot setting”

7

8. Click “Restart”

8

9. Press F7 or number keypad “7”

9

10. After you enter the system, the diver can be installed. If a safety warning pop-up, click always install it. Please refer to the file “for Vista win7 win8 win8.1”


MXQ Amlogic S805 Android 4.4 TVBOX Firmware 177320 150928

$
0
0

Hi, glad to share MXQ Amlogic S805 TV BOX latest firmware, please check below information:

Download link: MXQ Amlogic S805 TV BOX FIRMWARE
SD CARD FLASH MXQ Amlogic S805 TV BOX FIRMWARE

Password: geekbuying.com


The firmware update instruction is similar like the tronsmart vega s89, you can check here:

http://blog.geekbuying.com/index.php/2014/04/08/how-to-update-firmware-on-tronsmart-vega-s89-amlogic-s802-quad-core-tv-box-should-work-for-all-amlogic-device/

any questions, feel free to contact us.

Ainol Mini PC II Windows 8.1 & Android 4.4 Intel Z3735F Firmware 188804 150928

$
0
0
19

Hi, here glad to share the firmware of Ainol Mini PC II.

Download here: Ainol Mini PC II Windows 8.1 FirmwareAinol Mini PC II Android 4.4 Firmware

Prepare:
1、Two USB disk(one for Android disk , another for Windows disk) and one keyboard , one mouse(better use a usb hub to connect) will be used.

1

2、Making USB disk:
A、For Android disk:
a、After the android disk is plugged , go in this folder(provided by us)

2

b、find the PartitionWizard.exe and open it,the interface will be showed as follow:
3
c、click 4button to delete the android disk.

d、and then the button 5must be clicked to create a new disk:
6
(the option drew with red line must be set above,one is Primary,one is FAT32)

e、click “OK”.

f、The final thing is to click “Apply” to apply your setting.

7

B、Making Windows disk:
The method of making windows disk is the same with that of android disk,the only difference one is that the windows disk ‘s file system is NTFS:
8(the option drew with red line must be set above,one is Primary, one is NTFS)

Then rename the windows disk to “WINPE”,like this:

9

Update OS firmware
1、Copy all files in Android folder to the root directory of the android disk , and windows is the same.

A、Android OS must be installed first :
a、Plug the android disk into the target board,if the system in the board is dual OS,we must go in the android os for one time:

10

b、In android OS, click the power button and select “Reboot” to reboot:

11

c、after reboot , a logo will be showed as follow, 12
, press “Esc” key in the keyboard to go in BOIS setup interface:

13

d、in BOIS interface , select the “ Launch EFI from file system device ” option ,press Enter key in the keyboard to install android os:

14
B、installing windows OS:

a,Plug the windows disk into the target board:

15

b , in android os,reboot the system:

16

c、the interface below will be showed,press Left key in the keyboard,select the windows icon,press Enter key to continue:

17

d、Then we go in the windows install interface,just wait to finish:

18

update BOIS firmware
PS: please never try updating the bois firmware in a legal windowns 8.1 os , the key in it will be lost , and it is not repairable.
a , After windows installing is finished,go in the windows system,open the windows USB disk:

19
b , Go in the BOIS folder,and find run.bat file, right click and select“ Run as Administrator ” option, to run run.bat file.

c、after updating BOIS is done, it will reboot automatic.


H3_CX-968_v1.0 Beta CX-X3 4K Android Box Android 4.4 Allwinner H3 Firmware

Oukitel U7 Android 4.4 MTK6582 Smartphone Firmware 193734 20151002

Cherry Trail Atom Z8300 tested in Tronsmart Ara X5 micro PC

$
0
0
1

 Review: 14nm Atoms hit sweet-spot for tiny boxes

Intel’s new Cherry Trail Atoms are poised to revamp a few of market segments, namely 2-in-1s, tablets, and cheap mini PCs. So how does the new 14nm silicon compare to good old Bay Trail?

Intel’s Bay Trail Atom processors have been around for almost two years, and during that time we’ve tested a range of different devices based on these 22nm parts. Our first encounter with a Bay Trail SoC was the Asus T100TA Transformer tablet in late 2013, and since then, we’ve reviewed loads of Bay Trail devices, with prices ranging from $99 to $499. Now it’s time for Bay Trail to fade away, but don’t worry; the replacement is very good indeed.

IMG 6918

Intel Cherry Trail Atoms are taking over, and now that the new 14nm parts are showing up in a wide range devices, we went about looking for some samples. This is easier said than done because a lot of Cherry Trail products have been announced, but not that many are widely available in Europe. In addition to cheap 2-in-1s and tablets, Cherry Trail processors are also coming to small form factor machines, and we managed to get one of the first micro PC’s based on the new chip. It’s called the Tronsmart Ara X5 and it’s priced at $149 w/ free shipping via Chinese reseller Geekbuying.

The box is based on an Atom x5-Z8300 with 2GB of RAM and 32GB of storage. This is more or less standard for this product category, although we’ve seen micro PCs with 4GB of RAM and more storage. It all depends on the SKU you are going after (and your budget). We don’t mind seeing 2GB of RAM and cramped storage on these systems due to their low price: At $100-150, the whole point of such PCs is to keep them as affordable as possible, making them an attractive choice for secondary or even tertiary devices.

IMG 6896

Apart from the new 14nm processor, the Tronsmart Ara X5 is more or less a standard micro PC. You get two USB 2.0 ports, a USB 3.0 port, HDMI, and Micro SD slot. Broadcom’s AP6330 WiFi module takes care of 802.11a/b/g/n in 2.4GHz and 5GHz, and it also delivers Bluetooth 4.0 support. A standard LAN port is on board as well.

That’s more or less it, but before we take a closer looks at the chip and performance, let’s cover the basics and check out the device itself.


Design and Build Quality

The Tronsmart Ara X5 is a micro PC, measuring 115 x 120 x 27mm (4.65 x 4.47 x 1.06in). It’s roughly the size of three CD jewel cases stacked on top of each other. The design is simple and utilitarian. There’s no faux metal, no pastel colours or any other design features that would make it stand out.

front

The front of the device features two USB ports, an audio jack, activity LED and power button.

rear

At the rear you’ll find the rest of the connectors: HDMI, LAN, USB 3.0, DC in, micro SD slot.

left

From an ergonomic point of view, everything makes sense.

IMG 6904

While the design isn’t too exciting, build quality is good and we have no complaints in this respect. The Tronsmart weighs 211g.

rubber feet

The chassis is fashioned out of an acrylic panel, and the bottom is quite thick and sturdy. The device rests on four rubber feet, which allow for some airflow through the vents at the bottom.

The real fun starts under the bonnet.


Tronsmart Ara X5 Specs and Performance

Cherry Trail is not exactly a revolutionary processor design. It’s a “tock” in Intel’s “tick-tock” model. The CPU portion of the SoC is basically a die shrink of Bay Trail, manufactured using the latest 14nm node. The Airmont architecture is just a slightly modified Silvermont architecture, but since it’s manufactured in a superior node, it should deliver better sustained performance and higher CPU utilisation.

However, the transition to 14nm also left Intel with a lot of die space to play around with, and the chipmaker put it to good use by sticking a more powerful GPU in the package. Whereas Bay Trail relied on Ivy Bridge (Gen7) graphics, Cherry Trail features a new Gen 8 GPU, based on the same architecture you would find in its Broadwell big-cores. This means you get 4K/h.265 video acceleration, along with DirectX 11.2 support. The GPU supports up to two displays.

Since the new process allowed Intel to cram more transistors on the same die area, the GPU was bumped up from 4 execution units (EUs) to 12 or 16 EUs, depending on the SKU. Atom x5 parts sport 12 EUs, while x7 processors have 16 EUs.

This particular SKU, the Atom x5-Z8300, features four CPU cores and 12 EUs. The CPU is clocked at 1.44GHz to 1.84GHz, while the GPU runs at 200MHz to 500MHz. Despite the spec bump, the 14nm node allowed Intel to keep thermals in check, and the official SDP is just 2W.

The chip has 2MB of cache and it’s capable of addressing 2GB of DDR3L-RS 1600 memory (single channel). This is perhaps the chip’s biggest limitation. While 2GB wasn’t a big deal on Bay Trail over the past two years, we would have liked to see a bit more from Intel’s new entry-level SoC. Luckily, the rest of the Cherry Trail line-up supports up to 8GB of dual-channel memory, so this is only an issue for the x5-Z8300.

Speaking of which, Intel’s recommended customer price for this particular SoC is just $20. While this may sound like a bargain for an x86 chip, bear in mind that Cherry Trail isn’t exactly competing against AMD. It has to take on ARM-based SoCs from Qualcomm, MediaTek and other chipmakers.

Before we move on to the performance, let’s list the specs.

Tronsmart Ara X5 Specifications:

  • Processor: Intel Atom x5-Z8300 quad-core, 1.44GHz base, 1.84GHz Turbo, 14nm
  • Graphics: Intel HD Graphics Gen8, 200MHz base, 500MHz burst
  • RAM: 2GB DDR3L
  • Storage: 32GB eMMC, expandable via microSD card up to 32GB
  • Wireless: dual-band 802.11b/g/n, Bluetooth 4.0 (Broadcom AP6330)
  • Dimensions: 115 x 120 x 27mm (4.65 x 4.47 x 1.06in)
  • Weight: 211g
  • Ports: 2 x USB 2.0, 1x USB 3.0, HDMI, 3.5mm audio, 100Mbps RJ45, DC in (5V 3A)
  • OS: Windows 10

Now, if all the talk of more EUs and Intel’s bleeding-edge 14nm silicon has you all worked up, get ready to curb your expectations. Like we said, Airmont is just a Silvermont die-shrink with beefed up graphics. Furthermore, the 8300 is the entry-level Cherry Trail part, with relatively low clocks and single-channel memory support.

In spite of this, we pitted it against the Atom Z3736F, which is basically the fastest widely available Bay Trail chip. In other words, we are comparing the fastest Bay Trail to the slowest Cherry Trail part due to the fact that the first batch of Bay Trail parts was discontinued a while ago, but you can still pick up loads of products based on Z3736F and Z3735 silicon (and they tend to be very cheap).
While it’s a 22nm part, the Z3736F maxes out at 2.16GHz, almost 300MHz more than the new x5-Z8300. Its GPU also runs at somewhat higher clocks, but it’s based on an ancient architecture and has just 4 EUs.

13dmark

Long story short, even the entry-level Cherry Trail easily outpaces the Z3736F. In GPU tests, it ends up noticeably faster, plus it experiences less throttling. In 3DMark Ice Storm, it scores almost 19,000, ending up about 35% faster than the Z3736F.

1pcmark

Despite the lower clock, the PCMark score is about 20% higher than on the Z3736F. The GPU also helps in video encoding and casual gaming tests. The biggest difference is evident in the Photo Editing v2 test, which the Cherry Trail system completes in just over a second, while the Bay Trail takes 2.65s.

1aida mem

There is virtually no improvement on the memory front. In fact, in some cases, our Cherry Trail sample ended up slower than Z3736F systems we had a chance to test. However, it should be noted that this may be a vendor-specific score.

hdtune

Speaking of which, we also tested the Ara X5’s storage and got average results. We’ve seen faster eMMC drives in some systems. On the other hand, we also encountered much slower storage on some units, so the Tronsmart gets a pass.

crystal disk mark

Sandra and Aida CPU tests favour Cherry Trail over Bay Trail, although the difference is not that big in some cases.

1aidaexgpu

In fact, in the Aida PhotoWorxx test, the new SoC lags behind the Z3736F.

1sandraar

Sandra Arithmetic loves Intel’s new silicon and the margin is pretty wide.

As far as thermals go, we were very pleased with the results. Cherry Trail is somewhat cooler than Bay Trail, especially if you’re not running GPU-bound applications (realistically, few people will push the GPU to the limits). The SDP stands at 2W, or 10% less than the Z3736F, but the biggest difference is in sustained performance. Cherry Trail can keep running at higher clocks for a bit longer, that’s the whole point.

hwmonitor during pcmark8 bench

Our unit reported a CPU temperature of 67 degrees Celsius after running a few benchmarks. There’s practically no throttling. This is obviously good news for anyone considering a Cherry Trail tablet or micro PC.

cooling

While Bay Trail still manages to keep up in terms of overall performance, it also runs out of steam much faster. That’s why many Bay Trail micro PCs, and even stick PCs, feature active cooling. It’s a lot easier to get away with passive cooling with Cherry Trail.

bottom

Although Tronsmart opted for a plastic-acrylic chassis, the acrylic plate at the bottom is relatively thick and appears to help spread the heat evenly.


Setup and Everyday Use

Like all micro-PCs, the Tronsmart is extremely easy to set up and use. You can boot it up in minutes from unboxing.

IMG 6932

It does not rely on a standard micro USB charter for power, and it ships with a 5V 3A power brick. It has a full-size HDMI port at the back, along with RJ45 LAN. However, it’s not all good news.

hdmi lan power rear

For starters, we experienced a few WiFi and Bluetooth issues. We are not sure whether this was a hardware problem with our particular unit, or possibly a Broadcom driver issue. Since the unit started shipping with Windows 10 and a new Intel platform just a couple of weeks after launch, we can’t discount the software side of things. Be as it may, the Tronsmart’s antennas struggled with WiFi next to a few Bay Trail tablets and PCs that worked like a charm. The signal was way too low and we were unable to sort it out. Bluetooth was another problem and we had trouble connecting our Bluetooth keyboard to the sample.

usb30 rear

Another concern is the “USB 3.0” port at the back, because we didn’t exactly get USB 3.0 speeds on it. It doesn’t provide enough DC power to run an external hard drive, either.

copying 800mb file from usb30 stick kingston xyperx fury

Teething problems are quite common in pre-production samples, and when we factor in Windows 10 and Cherry Trail, it’s obvious that the manufacturer had a lot of unknowns to deal with. Still, we weren’t expecting such issues: WiFi, Bluetooth and USB 3.0 sound like pretty basic stuff, even for a pre-production sample.

Aside from these glaring issues, which can probably be attributed to the fact that this is an early sample, there’s not much to complain about. The connector layout is good, there’s an activity LED on board, the chassis doesn’t heat up too much, yet it’s relatively compact.


Conclusion

Intel’s new Atom looks like a promising piece of silicon. Built to a budget, the chip still manages to deliver a significant improvement on Bay Trail, especially in the GPU department. While GPU performance is not a huge deal on most cheap PCs, bear in mind that Cherry Trail will end up in millions of tablets running Android and Windows.

GPU performance was (and still is) the Achilles heel of Bay Tral SoCs, and Cherry Trail promises to change all that. However, it’s still not enough. High-end ARM processors, with the latest and fastest GPUs Qualcomm, ARM and Imagination Technologies GPUs, will still beat Cherry Trail in gaming, making them more suitable for premium tablets. However, Cherry Trail is an x86 chip and can also be used in tens of millions of Windows tablets and mini PCs.

Although it’s a “tock,” Cherry Trail is a good update and the chip looks like a winner. It’s a better all-round performer thanks to the new GPU, yet it’s more efficient and delivers more performance in the same thermal envelope. Also, bear in mind that this is an x5-Z8300 review – we haven’t had a chance to review the x5-Z8500, which can hit 2.24GHz on Turbo and address up to 8GB of memory (dual channel, naturally). Lastly, the x7-Z8700 is clocked at 1.6/2.4GHz and sports an even more powerful GPU, with 16 EUs.

Even the humble x5-Z8500 manages to beat the previous-gen Atom with a substantially higher clock, yet faster and more capable iterations of Cherry Trail SoCs should be much, much better.

As for the Tronsmart Ara X5, we liked the user-friendly design, the sturdy acrylic chassis, good thermals and relatively low price. However, we also encountered a few problems that may or may not be attributed to the fact that this is a pre-production unit. Hopefully, it’s just a matter of time before the WiFi/BT module gets a new driver that sorts these problems out.

   —- From Fudzilla

Zidoo X6 Pro Android TV Box Review

$
0
0

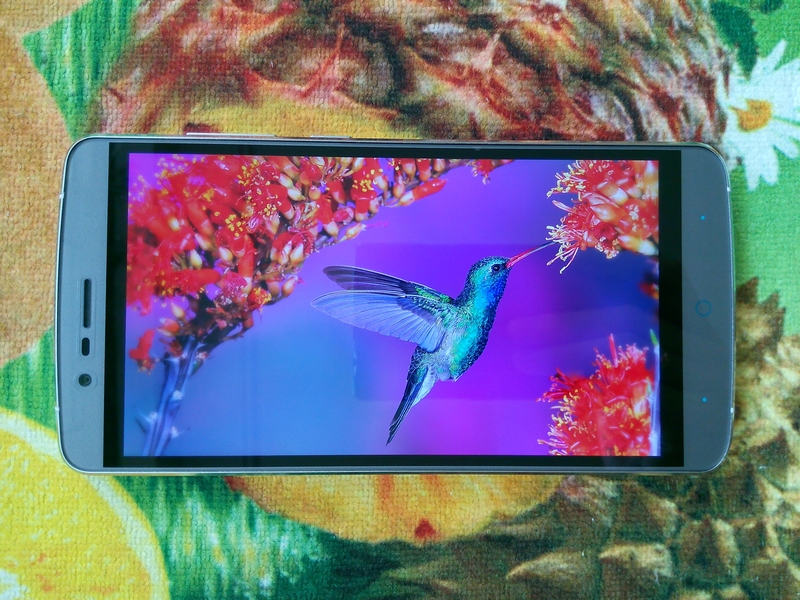
Zidoo X6 Pro is a 64-bit ARM Android TV Boxes based on Rockchip RK3368 processor, promising support for HDMI 2.0 and video decoding up to 4K2K @ 60Hz. While the others I’ve tried so far, such as Beelink i68, are pre-loaded with some version of Kodi 14.2, X6 Pro comes with a modified version of Kodi 15.1. I published pictures of the Zidoo X6 Pro TV box and board a few days ago, and today I’ll review the box’ features, performance, and capabilities.

First Boot, Settings and First Impressions

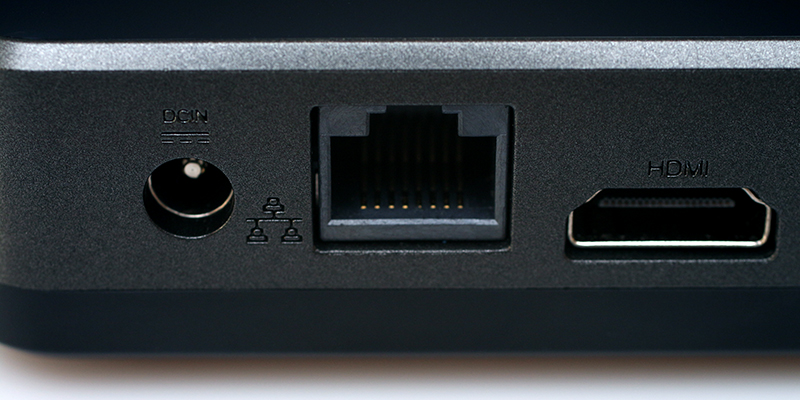
I’ve connected a USB hard drive to one of the two USB ports, as well as a USB hub with two RF dongles for Tronsmart Mars G01 gamepad and MeLE F10 Deluxe air mouse, a USB keyboard, and a USB webcam. I’ve also inserted an Ethernet cable, an HDMI cable, an optical audio cable, a Class 10 micro SD card, as well as the power adapter. The boot time takes just above one minute with all those peripherals attached.

Click for Original Size

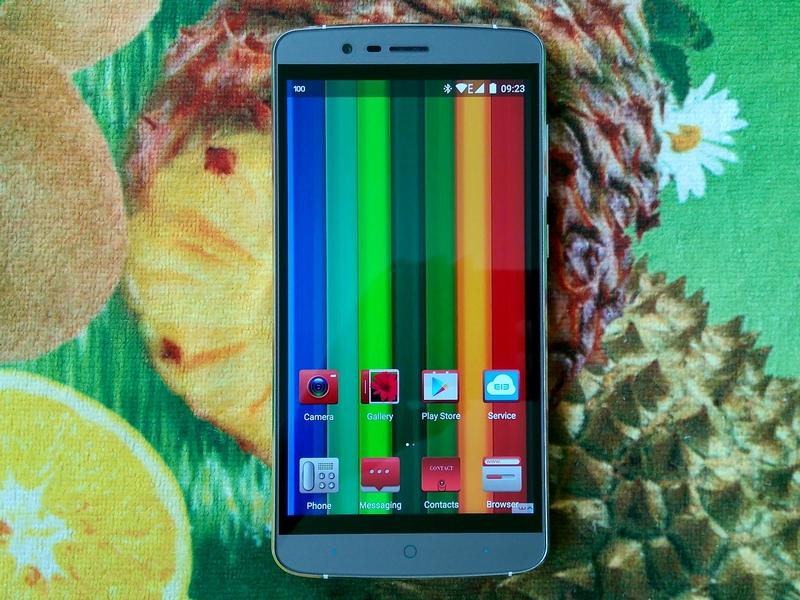
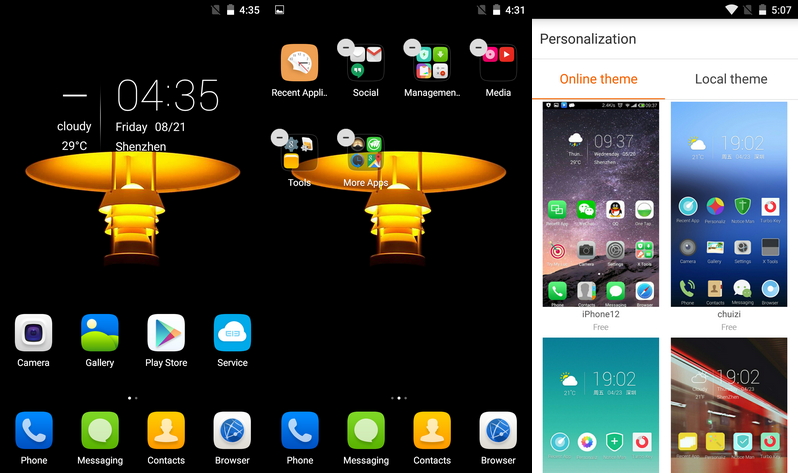
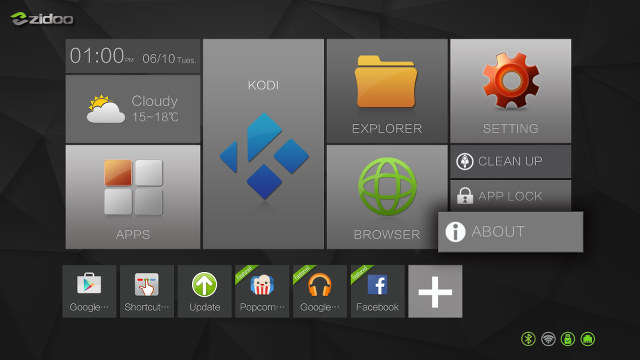
The launcher is another version of the company’s ZIUI user interface and includes widgets for date & time, and weather, as well as shortcuts to Kodi, the company’s “Explorer” file browser, Browser (Chrome), Setting, Clean up, App Lock, and About sections. There’s also a list a customizable shorting on the bottom of the interface. App lock is some sort of parental control, where you can define a password, and lock some apps, so that only persons who know the password can launch password protected apps. There are also some icons on the bottom right to indicate Bluetooth, WiFi, USB storage, and Ethernet status. The status bar is hidden by default, but you can pull it up with the mouse pointer to show software volumes button, Home, Back & Menu buttons, as well as a screenshooting icon, and power button. The user interface resolution is 1920×1080, however video output was set to 720p50, and I had to go to the settings to change video output to 3840x2160p60 (YCbCr420) as supported by LG 42UB820T 4K UHD TV used for testing.

The settings are the same as on Android Lollipop devices, but with options specific to TV boxes. Sections, sub-section and main options include:

  • Wireless & Networks – Wi-Fi, Bluetooth, Ehernet (sic.), and a “More” section with three sections: Tethering & portable hotspot, PPPoE and VPN
  • Device
    • USB – Connect to PC
    • Sound & Notifications – Volume for media/alarm/notifications, and a Sound Device Manager to select Default Output, Spdif Passthrough, or HDMI Bitstream
    • Display
      • Screen Scale
      • Output Interface – HDMI or TV
      • HDMI Mode:
        • Auto
        • 4096x2160p @ 60Hz (YCbCr420), 50Hz (YCbCr420), 30Hz, 25Hz, or 24Hz
        • 3840x2160p @ 60Hz (YCbCr420), 50Hz (YCbCr420), 30Hz, 25Hz, or 24Hz
        • 1920x1080p @ 60 Hz, 50Hz, 30Hz, 25Hz, 24Hz
        • 1280x720p @ 60 or 50 Hz
        • 720x576p @ 50 Hz
        • 720x480p @ 60 Hz
      • Daydream
      • Cast Screen
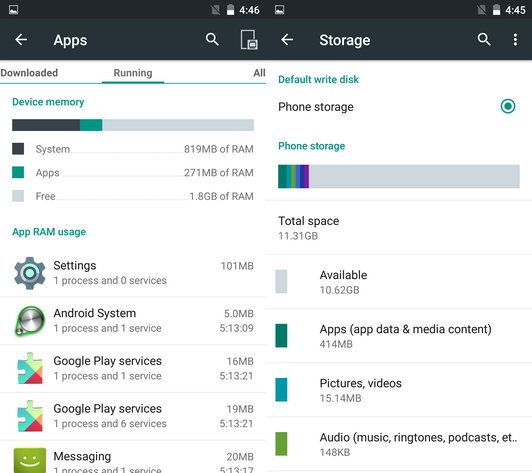
    • Storage – Unified 12.91GB internal storage partition with 12.32 GB free for app and data

Others sections such as Security, Language & Input, Users… are also there, but Printing is missing. If you want the full details, watch the walk-through video embedded below.

Ethernet, Wi-Fi, and Bluetooth all worked reliably, however, I’ve found that HDMI output may vary if you really on the automatic detection feature, or enable automatic frame rate switching in Kodi. Once I forced it to 2160p60, it worked just fine. I also had to adjust the “Screen Scale” to 100% to make sure the user interface was not zoomed in, with some black zones on the edges.

Going into “About device” shows “Zidoo_X6 ProI68” is the model number, and Android 5.1.1 is running on top of Linux 3.10.0. A ZDrepo Identify Code is also shown, just like in Zidoo X1. OTA firmware updated is enabled, but I already had the latest firmware, so I could not test it out. This firmware is rooted, and superuser pre-installed.

I’ve shot a walk-through video to show ZIUI user interface, and settings details.

The provided IR remote control works as advertised, including the IR learning function which I tried with power and volume keys of my TV. The range is a little shorter than usual, and it only worked reliably within 5 meters. As long as you just use Kodi or ZIUI, the remote control is fine, but I had to switch to an air mouse to navigate and use Android app more easily, and for text input. One nice detail is that the system detected my “hardware keyboard” and did not popup the software keyboard needlessly.

Google Play Store works just fine, expect for SMS / phone apps, and apps that can’t be installed due to country limitations. I also side-loaded Amazon Underground to install Riptide GP2 racing game.

There’s no power button on the unit itself, but it’s not needed, and Zidoo did a good job at handling power. A short press on the remote’s power key will show a menu with Power off, Standby, Reboot, and Auto power off. The first three option work as expected, and auto power off let you set a timer from 30 minutes to 48 hours, in thirty minutes increment, to either power off the device, or go into standby. A long press (~3 seconds) on the power key will also turn off the device cleanly.

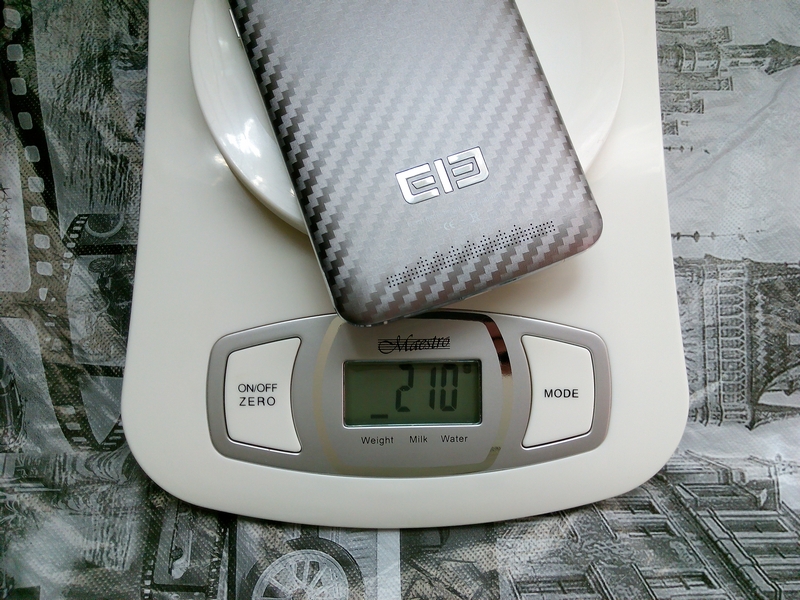
For those interested in power consumption these are the results with either no USB devices, or one USB hard drive:

  • Power off – 0 Watt
  • Standby – 1.3 Watt
  • Idle – 3.4 ~ 4.2 Watts
  • Power off + HDD – 0 Watt
  • Standby + HDD – 2.1 Watt (HDD light does turn off)
  • Idle + HDD – 6.0 ~ 6.4 Watts

Zidoo X6 Pro appears to get a little hotter than Beelink i68 RK3368 TV box, although still in the same range, as I measured 39°C and 58°C on the top and bottom of the enclosure after running Antutu 5.7, and after 15 to 20 minutes playing Riptide GP2 the temperature went up to 40°C and 66°C. Once I noticed Kodi started to feel sluggish, and noticed the bottom temperature reached 75°C max, and a reboot did not fix the sluggishness. So I powered off the box for a few minutes, and everything worked fine again. So there might be cases where the CPU throttles due to high temperature.

Apart from the only time Kodi felt sluggish, Zidoo X6 Pro performs pretty well, and the firmware is stable. I also appreciated some details like proper power handling, a single internal storage partition, software keyboard hidden when a hardware keyboard is detected, and so on.

Video Playback with Kodi 15

As mentioned in the introduction, Zidoo X6 Pro is the first RK3368 that comes with Kodi 15.1. Not the version from Google Play, but a version modified by Zidoo, with source code modifications available for everyone to see. Videos have been played from SAMBA shares located in an Ubuntu 14.04 computer and accessed over Ethernet.

Kodi 15.1 in Zidoo X6 Pro (Click for Original Size)

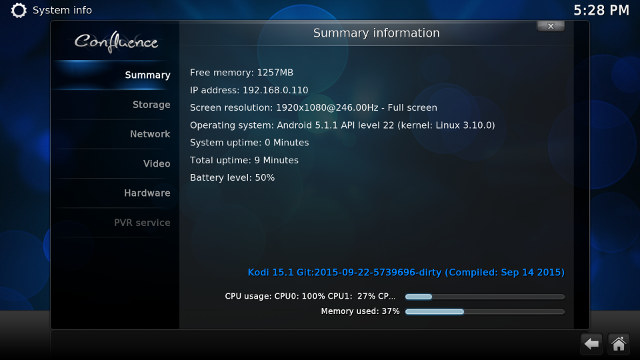
The refresh rate shown in Kodi’s System Info varied a lot from 11Hz to 246Hz as shown on the screenshot above, so it’s probably misreported. Before starting video playback, I went to the settings in Video->Playback, and set “Adjust display refresh rate” to “Always” to make sure I had the best playback experience. The refresh rate did change, but the output resolution changed too between 720p and 1080p, which is fine depending on the video, but the problem is that it would never go back to 2160p automatically on the video complete, and then even 4K videos were played at 1080p. So if you may want to disable automatic frame rate switching if you have a 4K TV, and plan on watching 4K videos, at least with this firmware (v1.0.15).

While I had a bad time in Kodi with Zidoo X1, Zidoo X6 Pro managed to play all samplemedia.linaro.org video samples I tried, as well as Elecard H.265/HEVC samples, and a low resolution VP9 video:

  • H.264 codec / MP4 container (Big Buck Bunny) – 480p/720p/1080p – OK
  • MPEG2 codec / MPG container – 480p/720p/1080p – OK
  • MPEG4 codec, AVI container 480p/720p/1080p – OK
  • VC1 codec (WMV) – 480p/720p/1080p – OK
  • Real Media (RMVB), 720p / 5Mbps – OK
  • WebM / VP8 – OK
  • H.265 codec / MPEG TS container (360p/720p/1080p) – OK
  • WebM / VP9 (no audio in video) – OK

Bear in mind that Zidoo disabled “drop” and “skip” fields in Kodi’s live log window, so I had to purely rely on my eyes. OK does not mean perfect, as I still feel videos are a bit smoother on Amlogic devices, but these were all watchable. One small issue was the lack of Zoom option during playback, as the only option I got was for 3D videos.

However with some higher bitrate videos I started to see some issues:

  • ED_HD.avi – Video plays for about 2 seconds before the image freezes. Audio is OK, and continues. I noticed one CPU core was stuck at 100%.
  • big_buck_bunny_1080p_surround.avi (1080p H.264 – 12 Mbps) – OK.
  • h264_1080p_hp_4.1_40mbps_birds.mkv (40 Mbps) – OK
  • hddvd_demo_17.5Mbps_1080p_VC1.mkv (17.5Mbps) – Could be smoother
  • Jellyfish-120-Mbps.mkv (120 Mbps video without audio) – I experience a long buffering before playback, and when it did play, it was not very smooth, and the next buffering occurred. I also got a message reading “cache full”.

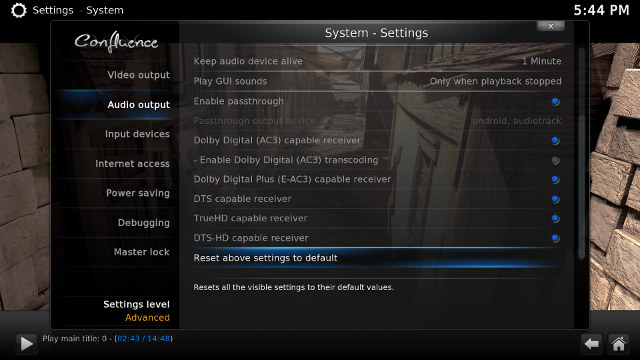
One of the key differentiating features of Zidoo’s Kodi implementation is support for 7.1 audio pass-through. So I’ve played some HD audio videos both down-mixed to PCM using Kodi and the internal player “Video” app, and audio pass-through with Onkyo TX-NR636 using HDMI pass-through with BD/DVD input, and optical S/PDIF with TV/CD input.

Zidoo_X6_Pro_Kodi_15.1_Audio_pass-throughYou’ll notice two new options for Audio output in Kodi: TrueHD capable receiver and DTS-HD capable receiver. You’ll also need to change PCM audio output in Android’s Sound settings to Spdif passthrough or HDMI bitstream as needed.

Video PCM Output
Kodi
PCM Output
“Video” app
HDMI Pass-through
Kodi
S/PDIF Pass-through
Kodi
AC3 / Dolby Digital 5.1 OK, but video aspect ratio is 1:1 OK OK (Dolby D 5.1) OK (Dolby D 5.1)
E-AC-3 / Dolby Digital+ 5.1 OK OK OK (Dolby D 5.1) OK (Dolby D 5.1)
Dolby Digital+ 7.1 OK OK OK (Dolby D+ 7.1) Audio Formats Not Supported over S/PDIF
TrueHD 5.1 OK OK OK (TrueHD 5.1)
TrueHD 7.1 OK OK Unreliable. Sometimes OK (TrueHD 7.1), sometimes no audio.
Dolby Atmos 7.1 OK Plays 3 seconds and output a regular “beep” and stops. Unreliable. Sometimes OK (TrueHD 7.1), sometimes no audio.
DTS HD Master OK OK OK (DTS-HD MSTR) DTS 5.1
DTS HD High Resolution OK OK OK (DTS-HD HR) DTS 5.1

These were the results I got during testing, but later I noticed the unreliable audio pass-through affected all TrueHD and DTS-HD audio streams. A reboot may fix the issue, but not always. Zidoo tested their boxes with an Onkyo AV receiver too, but a different model, so I wonder if there are some timing issues involved here which may cause the unreliable HD audio pass-through. You can see the problem first hand in the demo video I embedded below.

4K videos still played better on Zidoo X6 Pro than other boxes running Kodi 14.x, but there’s still some work to do:

  • HD.Club-4K-Chimei-inn-60mbps.mp4 – OK at the beginning, but then audio stops and video becomes slow
  • sintel-2010-4k.mkv – OK.
  • Beauty_3840x2160_120fps_420_8bit_HEVC_MP4.mp4 (H.265) – OK
  • Bosphorus_3840x2160_120fps_420_8bit_HEVC_MP4.mp4 (H.265) – Mostly OK, but the video seemed to stop for a very short time (<0.5s) at one point
  • Jockey_3840x2160_120fps_420_8bit_HEVC_TS.ts (H.265) – Won’t play, the system stays in user interface.
  • MHD_2013_2160p_ShowReel_R_9000f_24fps_RMN_QP23_10b.mkv (10-bit HEVC) – Stays in UI
  • phfx_4KHD_VP9TestFootage.webm (VP9) – Image quickly freezes.
  • BT.2020.20140602.ts (Rec.2020 compliant video) – Won’t play, the system stays in the user interface
  • big_buck_bunny_4k_H264_30fps.mp4 – OK
  • big_buck_bunny_4k_H264_60fps.mp4 – Audio/video synchronization issues, and the video could be a little smoother
  • Fifa_WorldCup2014_Uruguay-Colombia_4K-x265.mp4 (4K, H.265, 60 fps) – Looks perfect until after around 20 seconds, the audio and picture stops for a very short time, some artifacts are then displayed for 2 or 3 seconds, because normal playback resumes, and 20 to 30 seconds later the issue happens again.

As a side note, one document from Rockchip in Chinese appears to imply that while 4K H.265 @ 60 fps is supposed to work, 4K H.264 is limited to 30 fps in Kodi 15.x. You can watch a demo videos showing 4K playback and HD audio pass-through capabilities and issues I found on Kodi 15.1 on Zidoo X6 Pro.

Sintel-Bluray.iso and amay.iso (Ambra – Prism of Life) Blu-ray ISO files could play, but not very smoothly especially amat.iso (3 to 4 fps), and I noticed some buffering after a while. But with knowledge that the box may overheat, I retried one morning, and both video played very smoothly.

Both 1080i MPEG2 video samples (GridHD.mpg & Pastel1080i25HD.mpg) played fine, but as all boxes I tested so far, Hi10p failed:

  • [Commie] Steins;Gate – NCED [BD 720p AAC] [10bit] [C706859E].mkv – Audio OK, video with artifacts, and picture will freeze after a while
  • [1080p][16_REF_L5.1][mp3_2.0]Suzumiya Haruhi no Shoushitsu BD OP.mkv – Audio OK, video gets stuck after 3 to 4 seconds.

Bearing in my mind that my TV does not support 3D, I’ve still played some stereoscopic 3D videos to see if the system could decode them :

  • bbb_sunflower_1080p_60fps_stereo_abl.mp4 (1080p Over/Under) – Plays somewhat smoothly, audio/video sync issues or delay
  • bbb_sunflower_2160p_60fps_stereo_abl.mp4 (2160p Over/Under) – Audio only
  • Turbo_Film-DreamWorks_trailer_VO_3D.mp4 (1080p SBS) – OK

Several H.264, DViX/XVid, VOB/IFO, MKV, and MP4 movies could play without issues, while most FLV videos worked, but a few could not play staying in the UI, with only audio playing.

I could play a full 1080p MKV movie (exactly 1920×800, H.264, about 2 hours long) without interruption, and the overheating issue I saw sometimes did not occur with that movie. Dropped and skipped frames were all reported to be zero, but I suspect Zidoo disabled it for some reasons.

Antutu Video Tester was installed from Google Play (Version 2.2), and upgraded to version 3.0 before running the test. Zidoo X6 Pro got only 328 points, strangely lower than Beelink i68.

Click to Enlarge


Most video samples used in this review can be found in “Where to get video, audio and images samples” post and its comments section.

Network Performance (Wi-Fi and Ethernet)

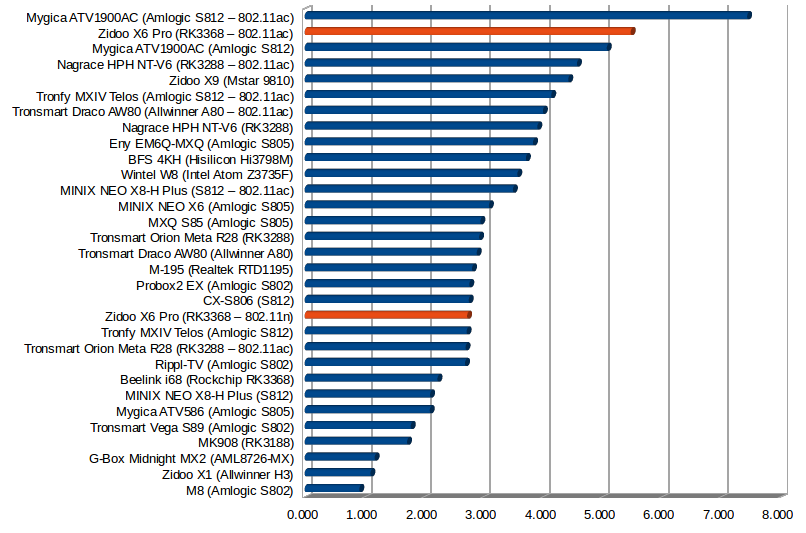
A file (278MB for WiFi and Fast Ethernet, 885MB for Gigabit Ethernet) is transferred between a SAMBA share and the internal storage three times using ES File Explorer, and I average the results to report Wi-Fi and Ethernet performance. WiFi 802.11n @ 2.4GHz performance is average @ 2.73 MB/s, while 802.11ac (433 Mbps) @ 5.4 MB/s is one of the best I’ve seen so far.

WiFi Performance in MB/s (Click to Enlarge)

I tested full duplex performance over WiFi for 60 seconds using “iperf -t 60 -c 192.168.0.104 -d” and the results are not quite good, as I don’t think WiFi is good at transferring data in both directions.

  • WiFi 802.11n @ 2.4 GHz (65 Mbps – Good signal)


  • Wifi 802.11ac (433Mbps, sometimes 6 to 12 Mbps – Excellent signal) – Test 2:


  • Wifi 802.11ac – Test 3:


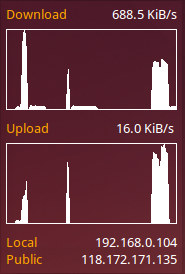
The image below is a screenshot of Conky on my Ubuntu 14.04 computer used as iperf server. I shows three tests I did with 802.11ac, and while all 3 start very fast in both direction, the transfer rate collapses after several seconds. You can see that at the end of test 3 transfer rates were 688.5 Kbit/s and 16.0 Kbit/s.Zidoo_X6_Pro_iperf_wifi_ac

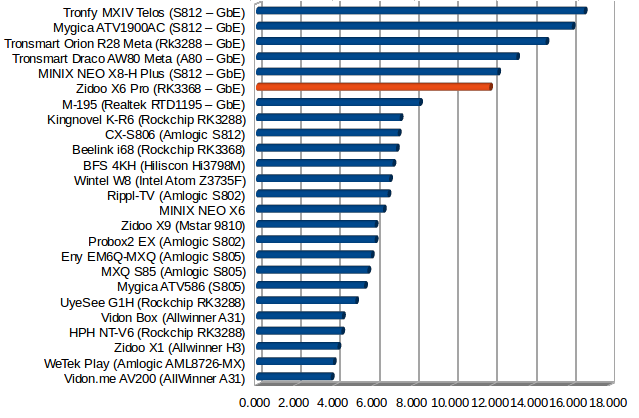
Gigabit Ethernet performance is not outstanding, but still much better than for devices with Fast Ethernet, as I could transfer a file at 11.88 MB/s on average.

Throughput in MB/s

iperf shows Zidoo X6 Pro is actually pretty good, and the fourth best device with Gigabit Ethernet I’ve tested, when we add the transfer rate in both directions.

Throughput in Mbps

iperf output:


Miscellaneous Tests

Bluetooth

I could transfer several pictures, after pairing X6 Pro with Iocean M6572 smartphone. I did notice that the option to make Zidoo X6 Pro (Bluetooth ID: rk3368) discoverable was missing, so you can find your phone, or other Bluetooth device with the TV box, but not the way around.

A Bluetooth PS3 controller clone could work just fine using Sixaxis Compatibility check using the instructions posted on How to Play Games in Android mini PCs / STBs With a PS3 Bluetooth Controller.

I had to skip Bluetooth LE tested, as my Vidonn X5 fitness band “passed away”. A Bluetooth headset pair and worked without issues.

Storage

FAT32 (micro SD card), NTFS, EXT-4 & exFAT (USB hard drive) partitions could all be mounted in read/write mode, with the only unsupported file system being BTRFS.

File System Read Write
NTFS OK OK
EXT-4 OK OK
exFAT OK OK
BTRFS Not mounted Not mounted
FAT32 OK OK

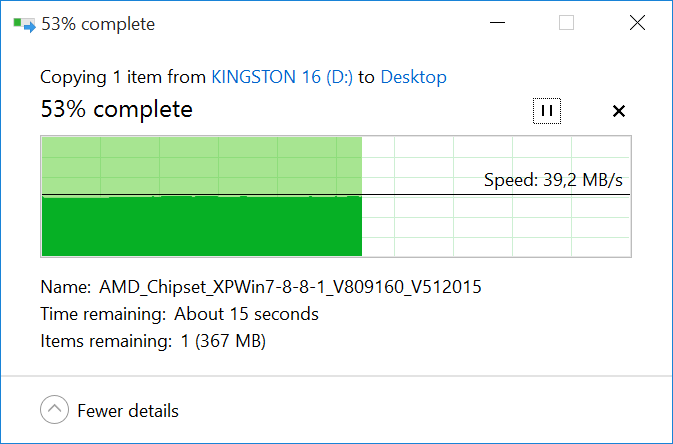
A1 SD Bench results for the 3 partitions on the USB hard drive:

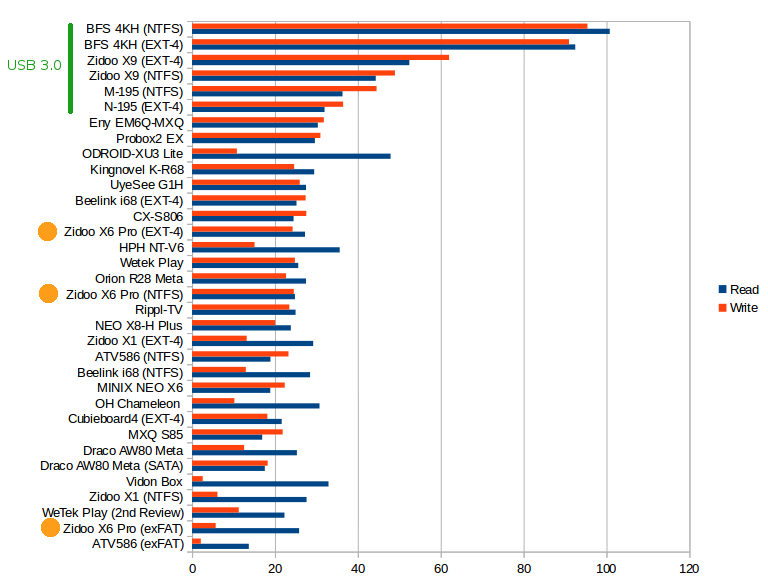
  • NTFS (/mnt/usb_storage/USB_DISK4/USB3_NTFS) – Read: 24.83 MB/s , Write: 24.86 MB/s
  • EXT-4 (/mnt/usb_storage/USB_DISK4/udisk1) – Read: 27.26 MB/s, Write: 24.26 MB/s
  • exFAT (/mnt/usb_storage/USB_DISK4/udisk2) – Read: 25.83 MB/s, Write: 5.70 MB/s

Read and Write Speeds in MB/s (Click to Enlarge)

Performance is acceptable for a USB 2.0 connection, but if write speed is important to you, better stick with NTFS or EXT-4, and avoid exFAT.

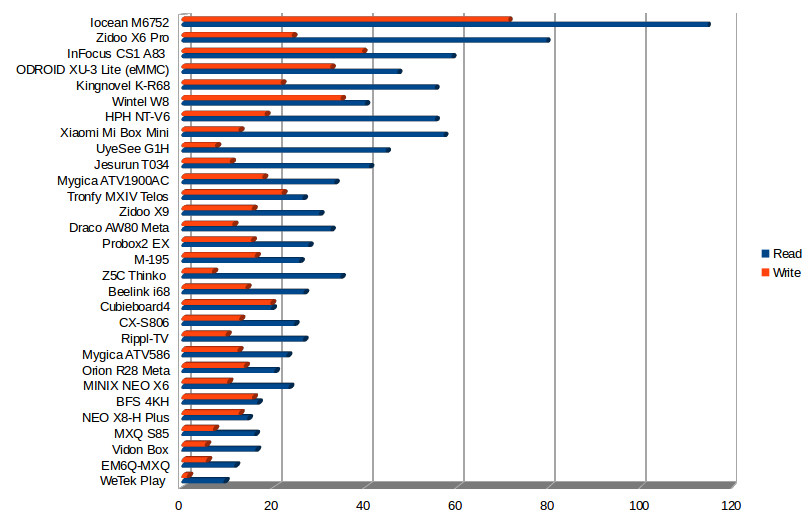
The Toshiba eMMC flash in X6 Pro makes it the fastest TV box I’ve tested so far with a read speed of 79.50 MB/s, and write speed of 24.02 MB/s.

Read and Write Speeds in MB/s (Click to Enlarge)

USB Webcam

A UVC USB webcam was tested successfully with both Skype and Google Hangouts.

Gaming

Candy Crush Saga was just fine with the air mouse. But when I switched to a wireless gamepad with two 3D racing games, namely Beach Buggy Racing, and Riptide GP2, I could definitely confirm this is not a gaming platform, possibly because of the overheating issues I experienced before. Beach Buggy Racing was playable, but not as smooth a I like, and if I set the graphics settings to “high resolution” the gaming would still be playable, but not enjoyable… Riptide GP2 did not have a high framerate either, maybe 10 to 15 fps, and after about 10 minutes of play I got a window telling me the game was not responding: wait or close?

Zidoo X6 Pro Benchmarks

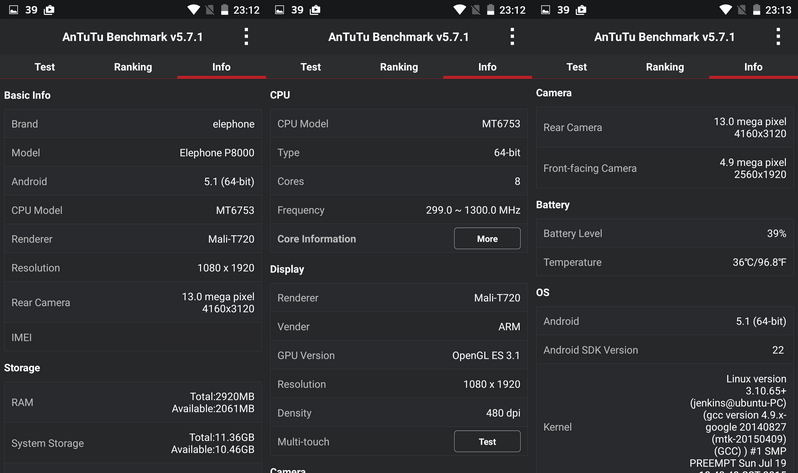
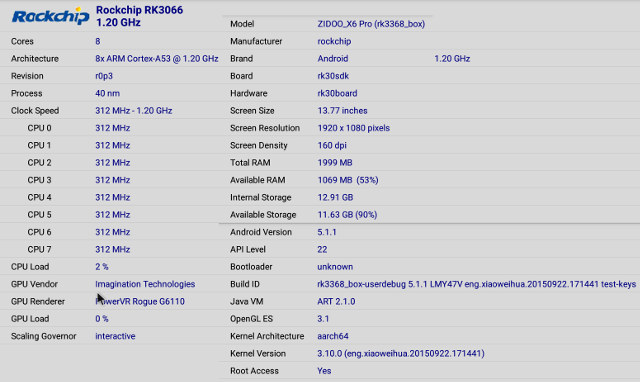
CPU-Z has still not added Rockchip RK3368 to its database, so it’s recognized as an 8 core RK3066 processor @ 1.20 GHz.

Click to Enlarge

But the rest of the information appears to be mostly correct with eight Cortex A53 cores clocked between 312 MHz and 1.20 GHz, a G6110 GPU, 2GB, and 12.91 GB storage. The model is ZIDOO_X6 Pro (rk3368_box) with 1920×1080 screen resolution, and an aarch64 Linux kernel.

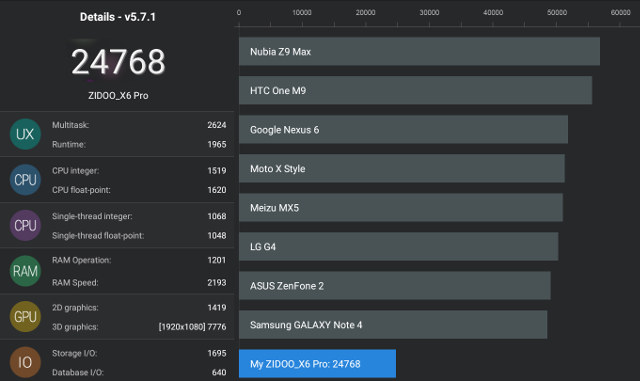
For some reasons the Antutu 5.7.3 score is quite low, i.e. 24,768, against a much higher 34,171 score with Beelink i68. But that score is probably more representative of the performance, as in RK3368 vs RK3288 performance comparison, I noticed some unusual results, and Antutu looked much better than some other benchmarks for RK3368.

Zidoo_X6_Pro_Antutu_5.7.1
Still that’s quite a difference. Only storage I/O looks better for Zidoo X6 Pro.

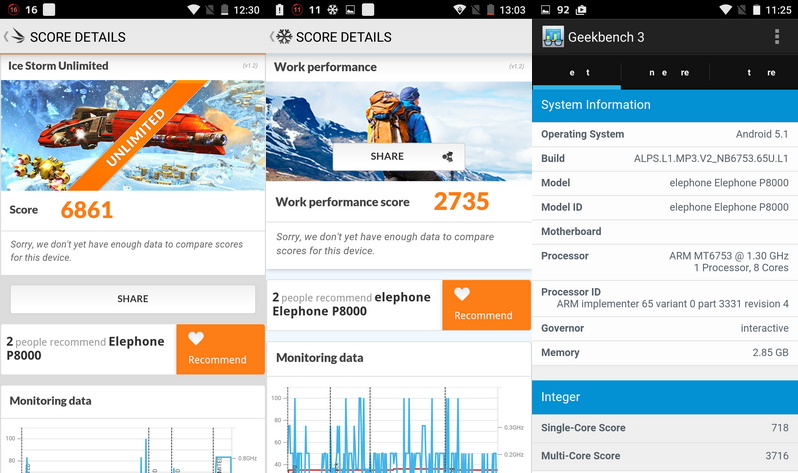
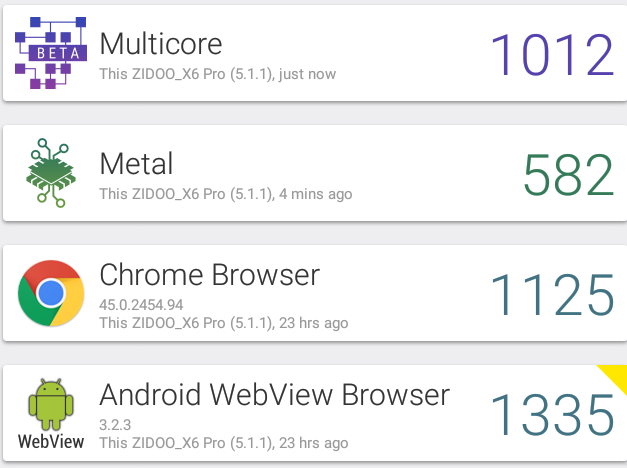
That’s why it’s important to run some other benchmark too, such as Vellamo.
Zidoo_6_Pro_Vellamo
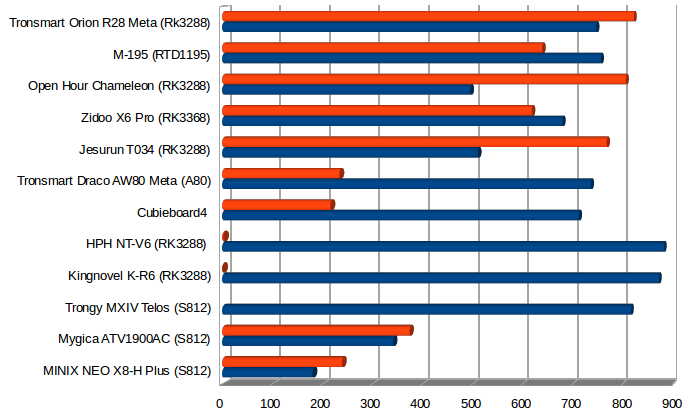
I normally run the Browser test using the Android stock browser, but in this firmware I only had Chrome Brower and WebView. The latter ended with warnings as shown by the yellow “sticker” on the right side. The Metal and multicore tests should be comparable however, and while Zidoo X6 Pro got respectively 582 and 1,012 points, Beelink i68 had significantly higher scores: 773 points, and 1288 points.
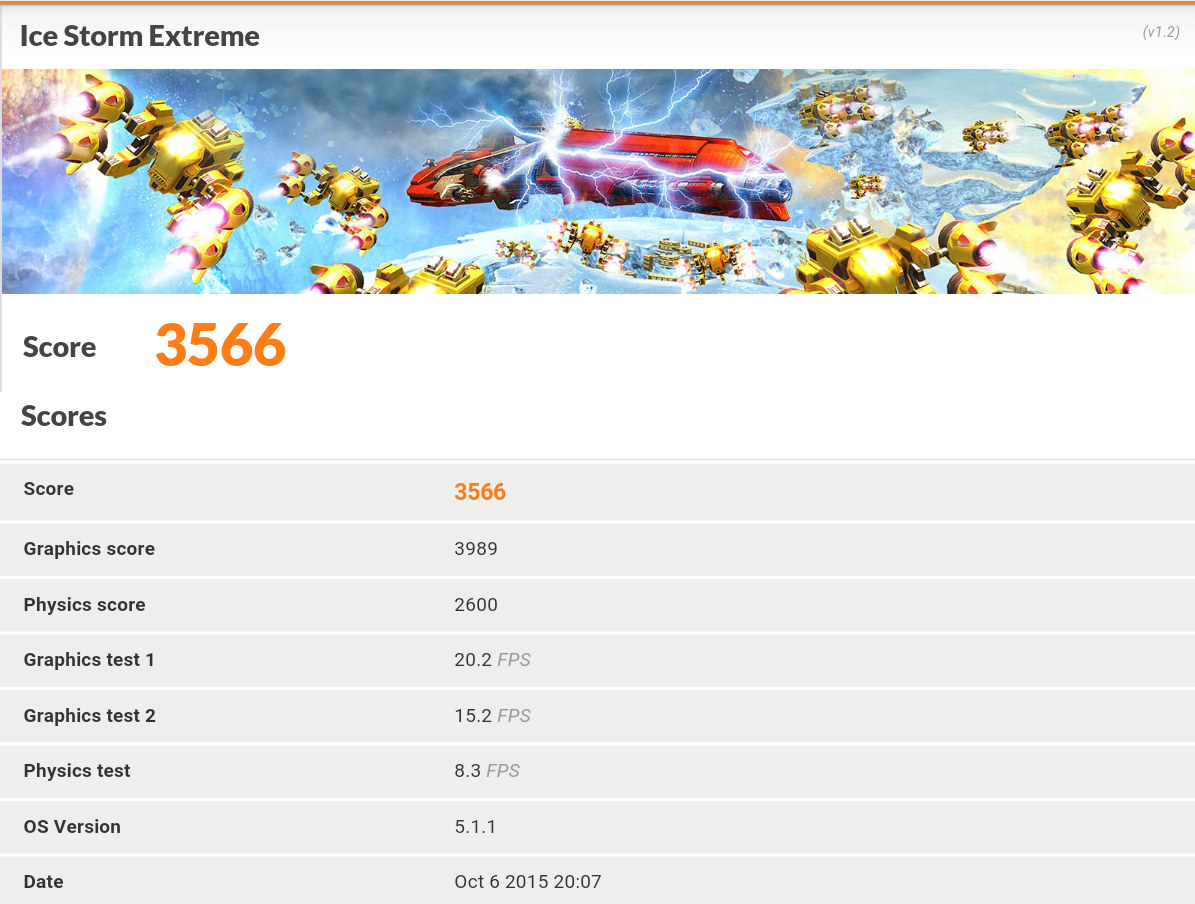
Zidoo_X6_Pro_Ice_Storm_Extreme3D Mark’s Ice Storm Extreme confirmed the lower performance of Zidoo X6 Pro in benchmarks, as Beelink i68 hot 4,248 points in that particular benchmark. Both system are running RK3368 at 1.2 GHz maximum with an interactive governor, so I’m not sure what may explain the differences in benchmark results.

Conclusion

Zidoo selected high quality components when making their hardware, and for example, the Toshiba eMMC is the fastest I’ve tested so far in any Android TV boxes, and Wi-Fi and Ethernet performance is either average (802.11n and Gigabit Ethernet) or excellent (802.11ac), but the main worry is that X6 Pro may overheat, and RK3368 processor may throttle at times, greatly reducing the performance of the system. Hopefully, this can be solved with some tweaks in the kernel governor. Kodi 15.x Zidoo edition works much better than Kodi 14.2 in Beelink i68 (also based on RK3368), with TrueHD and DTS-HD audio pass-through over HDMI, and 4K video playback (H.265 @ 60fps, H.264 @ 30 fps). However it’s still far from perfect, as 7.1 channel pass-through only works intermittently using my Onkyo receiver, and a 4K H.265 video sample @ 60 fps suffered from artifacts every half minute. Hopefully, these issues will be fixed with upcoming firmware updates, as overall I find Zidoo Z6 Pro to be a promising platform with a decent firmware base and good hardware.

PROS

  • Recent Android 5.1 OS firmware is both responsive (most of the time) and stable
  • Kodi 15.1 with 3D MVC, 7 channel audio pass-through, and H.265 / 4K hardware decoding
  • HDMI 2.0 video output works up to 2160p60 Hz
  • Good Ethernet and WiFi performance
  • Best eMMC performance of Android TV boxes I’ve tested, and with a unified 12.9GB flash partition for data and apps.
  • Support for FAT32, NTFS, EXT-4, and exFAT file systems
  • Proper power handling, also including timer to power off/go into standby
  • USB webcam is working in Skype and Hangouts
  • OTA firmware update
  • GPL compliance for Kodi (but not the Linux kernel)

CONS

  • The box may overheat, leading the CPU to throttle, and bringing user experience which reminded me of single core Cortex A8 processor. Solution: et the box cool down for a little while. It happened while using Kodi, and playing Riptide GP2. I could still watch a full 2-hour 1080p movie without the heat issue occurring however.
  • Kodi 15.1 works better than on other boxes but there are still some issues
    • 7.1 channel audio pass-through is unreliable, at least with Onkyo TX636-NR AV receiver. Sometimes it works, sometimes it does not (with the same video).
    • Automatic frame rate switching will also change output resolution. For example if HDMI output is set to 2160p60, and you play a 1080p24 video, it will switch to 1080p24 video output (OK), but once it is finished, the video output will stay at 1080p resolution, even for 4K videos
    • 4K H.265 @ 60 fps plays, but in the video sample I used I had artifacts for about 2 seconds, every 20 to 30 seconds.
    • I could not access zoom options in most videos (minor issue)
    • Auto-repeat is ON by default (minor issue)
    • In some instances, Kodi may be quite slow to exit
  • Benchmark results significantly lower than in Beelink i68 (also based on RK3368), even with Antutu Video Tester 3.0.
  • 3D games like Beach Buggy Racing and Riptide GP2 suffer from relatively low frame rate

Both Zidoo and Geekbuying provided a sample for this review. Distributors may consider contacting Zidoo via the product page to order in quantities, while individuals may purchase Zidoo X6 Pro on Geekbuying for $99. Few sellers currently sell the box, as Geekbuying might have the exclusivity, but I also found the products listed on on eBay ($120) and Aliexpress ($109).

— From CNXSoft

Teclast X98 Air II (HG5N) Android4.4.4_V2.05 Firmware 179859 Released 20151013

$
0
0

Hi, here glad to share Teclast X98 Air II (ID: HG5N) newest firmware: X98 Air II (HG5N)-Android4.4.4-V2.05. (Password: geekbuying.com)

V2.05 update contents:
1、Solve the problem of Wifi abnormal connection in low temperature condition;
2、Solve the abnormal use of google play;
3、Solve the voice unlock error problem;
4、Solve the front camera shooting problem and optimize the shooting effect;
5、Add the system browser and the default is Senma search engine;
6、Solve the problem of coincident MAC addresses;
7、Add Intel newest patch about this solution, comprehensively improve system stability and compatibility.

Attention matters:
1, please apply it to the corresponding ID, don’t use on other ID.
2, please read the flash guides carefully before operating.

Viewing all 3184 articles
Browse latest View live